DIY

Rustic Saw Mark Wood Barn Door

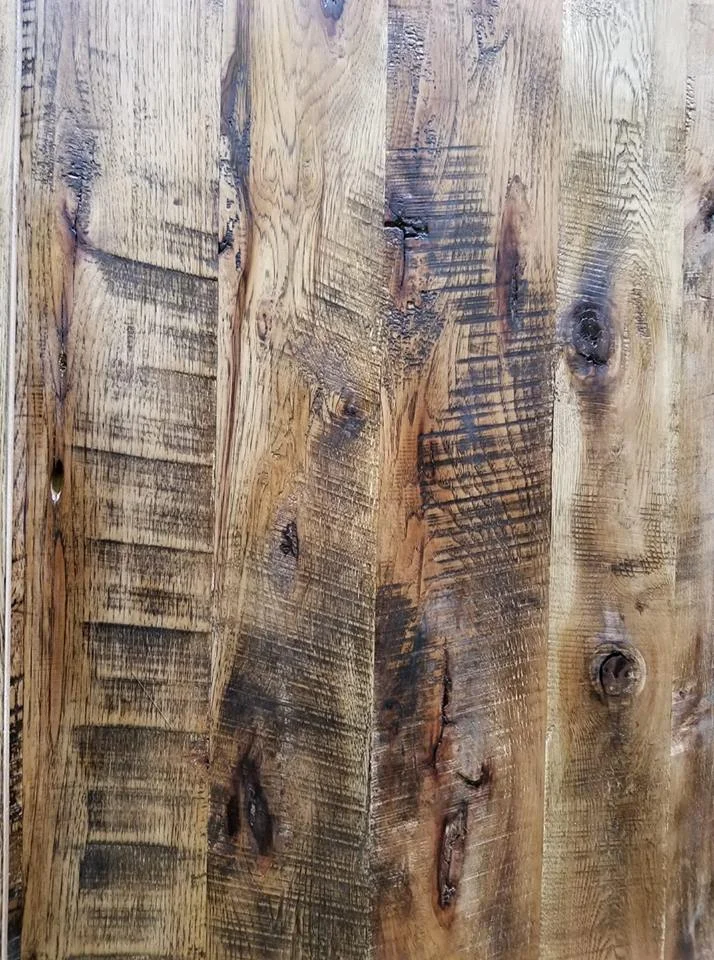
We wanted to try something a little different in the Cajun Salvage Shop, so we picked up some rustic mesquite boards from a local supplier, if you’re fortunate, some shops will straight line cut both sides of your boards which will make it easier for glue up. This was a very large door so trying to run the long boards through the shop planer can be a challenge without any help. Mesquite on the wood hardness scale is high up there, so it's not the easiest material to work with. If you don’t have a jointer and planer this will be a difficult project to take on. So make sure you have sharp blades on all your equipment when working with harder woods.

Mesquite is not a typical wood we use in the Cajun Salvage shop, mostly pine and cypress, but the mesquite wood had amazing saw marks so we decide what the heck.

The mesquite boards were straight lined cut by our friends down at the saw mill. Once the wood arrived at the shop we ran them through our joiner to make sure they were straight. (They usually are but this I like to double check.) Rough cut boards are usually not all the same thickness, if needed some boards might need to be run through a planer to cut down to proper thickness. Using a biscuit joiner to cut holes for the biscuit, we cut 7 holes per joint. We then apply glue and add the biscuits, align all the biscuits then clamp the boards together using pipe clamps to make the blank. We typically leave the boards long and cut then ends once the glue drys.

We cut the boards for the design on the front of the door, using a pocket hole jig we cut pocket holes, glue and screw from the back side.

The cross bracing can be tricky, so cut the pieces longer than needed. The longer piece in the x brace are placed under the design and traced, once traced cut your angle and pocked hole cut to attach. Attach and repeat the process with the short pieces in the cross bracing.

Once your design is complete turn the design over and apply glue to the backside. Flip design back over and clamp to the door.

We let our glue dry overnight on all our project.

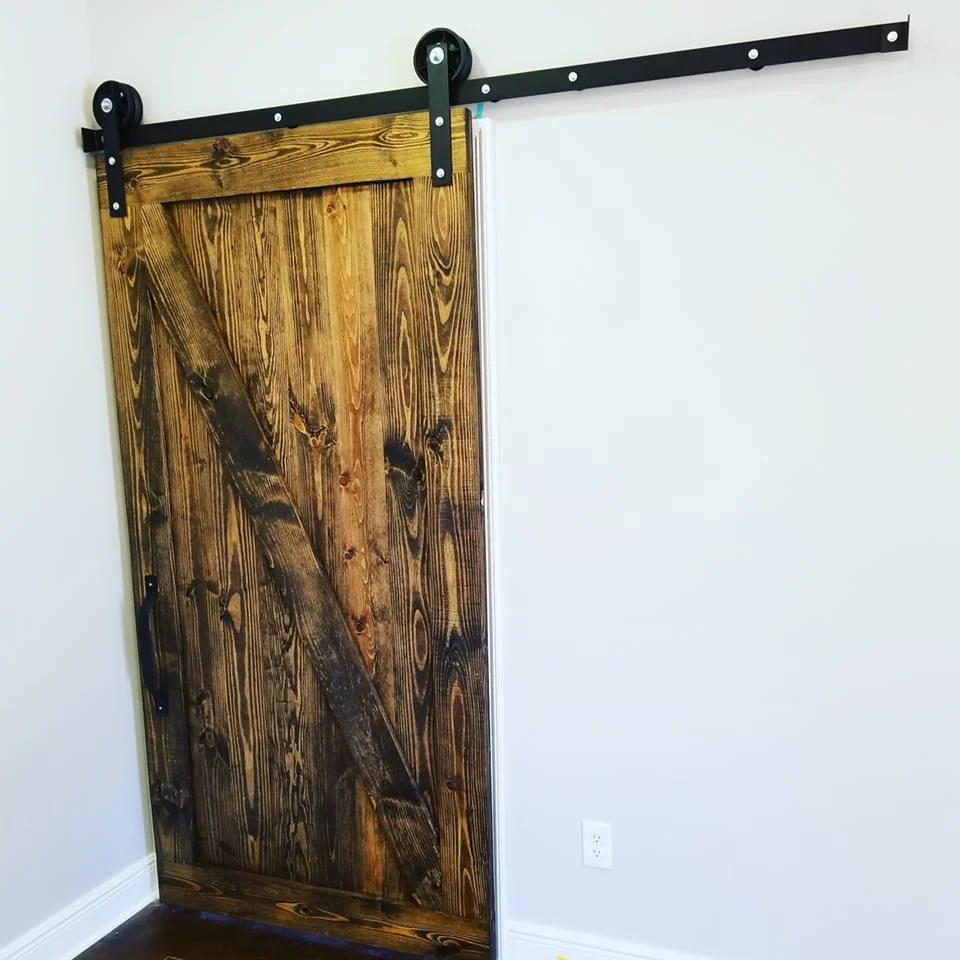
For the finish, we applied a dark stain, let dry for a min, and then wiped off. We sanded with 150 grit to bring out some of the color of the wood and applied a poly to make the wood pop!!

Here is the finished project!! This door ended up being 106” x 48” and 2” thick, weighing in at over 300 lbs. We ended up using our Industrial Cajun Salvage Barn Door Hardware which we custom make for larger door applications.

THE BS BEHIND A $40 Barn Door!!!

$40 Ish Dollar Barn Door

I love reading articles about $10 barn doors using pallet wood or building a barn door for $40 (without hardware). But really, have you ever tried taking a pallet apart? Its time consuming and not on the top of my fun list. And let's face it, after a project you tend to throw all that scrap wood away, it takes up space. And if you are like me you tend to keep every piece, the problem with this is you can never find what you’re looking for when you need it. Then maybe you are that lucky person that super organized and has all the pieces for the project! Good for you!

But let's look at the items you need.

Sand Paper 150 Grit $14.99

Glue $9.99

Wood $110

Stain $5

Finish $9.50

Screws or nails $5

Wood filer (optional) $12.97

Painting supplies $15

Total $182.45

Cheap Hardware $100

Grand Total $282.45

So for a grand total of $282.45, you can build a barn door yourself, and yes you might be able to get the price down a little with some of the items you already have laying around. But for someone that doesn't, plan to spend around $300 for a DIY Barn Door and Hardware install.

One option to keep cost low is using MDF plywood. MDF is cheap and comes in a 4x8 sheet, it can be easily cut down and used to make a cheap barn door. Best part is, little to no sanding and easy to paint. (Painted Barn Doors ONLY)

Staining Our Reclaimed Barn Wood King Size Bed

We had the opportunity to work on a extremely special project this summer. We built this rustic reclaimed barn wood king size bed for a lovely couple in the Lafayette, Louisiana area. The wood used to build this reclaimed barn wood bed was sourced locally from demoed homes and barns in Acadiana. We actually demo these homes and barns and reuse the wood in many of our projects. The bed was a mixture of reclaimed pine and reclaimed cypress giving it the color contrast you see. We also used 4x6 heart pine legs to give the bed a bulky look. To finish the bed we lightly sanded with LotFancy Sandpaper 5-Inch 8-Hole 150 Grit Dustless Hook-and-Loop Sanding Disc Sander Paper, Pack of 100(We try to plan ahead for projects and buy items ahead of time, typically we can get sandpaper and all our finishes at a cheaper price online giving us a better bottom line, every dollar counts in the woodworking business!!.) Next we apply a coat of Watco 65951 Danish Oil Wood Finish, Pint, Medium Walnut using 36 Pack of Single X Thick Paint and Chip Paint Brushes for Paint, Stains, Varnishes, Glues, Acrylics and Gesso. (2 inch). Let the Watsco dry 24 to 48 hours, if not when you apply the wax it will leave a sticky feel to the wood. Once the Watsco drys apply a coat of Harrell's Wax: Khaki 225 Gram Canwith a brush or rag, let dry for 15 mins and buff off with a 7" Bench Brush Shop Brush, Dust Brush for Car or Home or Workshop. Once a year you can apply the Harrells wax if you see that the finish is getting dull. If you have any question please comment below.

First picture is the Cypress King Size bed finished. Second is a picture after the Watco 65951 Danish Oil Wood Finish, Pint, Medium Walnut was applied. ( It applies dark but will dry to a lighter color.) Third picture is the sanded bed before applying the Watco Medium Walnut.


Benefits of Barn Doors and Barn Door Options

Barn Doors are a great option for limited space applications, such as small bed rooms, living rooms, and kitchen areas. Sliding barn doors can increase the value of your home, in many cases homes have sold for up to 10% over the expected value.  Homes with sliding barn doors have also sold faster on average then other homes without. This makes sliding barn doors a great option not only for looks but as a great return on your investment.

Three Sliding Options When Choosing Barn Doors:

  1. Single Sliding Barn Door Hardware: This is the most popular option, the door will slide to one side only. Tracks will typically be ordered double the size of the door. (Link to example below)

    SMARTSTANDARD SDH-0080-STANDARD-BK Heavy Duty Sliding Barn Door Hardware Kit, 8ft Single Rail, Fit 42"-48" Wide DoorPanel, Black, Super Smoothly and Quietly, Simple and Easy to Install

  2. Double Sliding Barn Door Hardware: If you limited on wall space on one side of the opening for a single large door, you can use the double sliding barn door hardware kit. This allows you to open the door to either side of the opening. (Link to example below)

    10ft Heavy Duty Double Door Sliding Barn Door Hardware Kit - Super Smoothly and Quietly - Simple and Easy to Install - Includes Step-by-Step Installation Instruction - Fit 30" Wide Door Panel(I Shape)

  3. ByPass Sliding Barn Door Hardware: These are great to install barn doors on a closet opening, or on an opening that goes wall to wall. The bypass hardware allows you to stack the doors on one side of the opening or the other depening on what side you want to access. (Link to example below)

    6.6ft Bypass Double Door Sliding Barn Door Hardware - Smoothly and Quietly - Simple and Easy to Install - Includes Step-By-Step Installation Instruction - Fit 40" Wide Door Panel (2 x 6.6 foot Rail)

Contact us today for a quote.